Download
In this section
Download the latest stable xtd version
You can download latest stable version on SourceForge.

See release notes to known the latest xtd version.
Clone the latest xtd commit
Or clone latest development version on GitHub.
git clone https://github.com/gammasoft71/xtd.git
Libraries dependency
xtd is currently in development mode and the only xtd.forms.native.wxwidgets backend is supported.
wxWidgets 3.1.5 will be automatically installed with xtd.
In the future xtd.forms will use xtd.forms.native.win32 on Windows, xtd.forms.native.cocoa on macOS and xtd.forms.native.gtk4 on linux. Other backend like xtd.forms.native.qt5 will be ported too.
Installation
Windows 10 or later
-
Install Microsoft Visual Studio 2019 Community or later
In order to build xtd, you first need download and install Microsoft Visual Studio 2019 community from https://www.visualstudio.com.
-
Install CMake 3.3 or later
After Microsoft Visual Studio, you need to install the latest version cmake from https://cmake.org/download/
Remarks: Verify if you can execute 'cmake --version' in "Command Prompt", if it's no, add cmake install directory to your path.
-
After installing Microsoft Visual Studio and CMake, do the following in "Command Prompt" to build and install xtd :
cd xtd_path_name
install
-
Create as many applications as you want with xtd.
macOS 10.15 or later
-
Install Xcode 11.6 or later
In order to build xtd, you first need download and install Xcode from App Store and install "Commands line tools".
Remarks: Verify if you can execute 'clang --version' in "Terminal".
-
Install Homebrew
After Xcode, to build xtd, you need to install package manager Homebrew.
/bin/bash -c "$(curl -fsSL https://raw.githubusercontent.com/Homebrew/install/master/install.sh)"
-
Add homebrew to your path
echo 'eval "$(/opt/homebrew/bin/brew shellenv)"' >> /Users/yves/.zprofile
eval "$(/opt/homebrew/bin/brew shellenv)"
-
After installing Xcode and Homebrew, do the following in "Terminal" to Build and install :
cd xtd_path_name
./install
-
Create as many applications as you want with xtd.
Linux distribution fully supported by xtd install
The following list contains the Linux distributions fully supported by the xtd installation:
- CentOS 7;
-
Do the following in "Terminal" to Build and install :
cd xtd_path_name
./install
-
Create as many applications as you want with xtd.
Other linux distribution
-
Install g++ 9 or later
In order to build , you first need download and install g++ 9 or later.
Remarks: Verify if you can execute 'g++ --version' in "Terminal".
-
Install gtk3
-
After g++ and gsound, you need to install gtk3.
-
Install CMake 3.3 or later
After g++, gsound and gtk3, you need to install the latest version cmake from https://cmake.org/download/
Remarks: Verify if you can execute 'cmake --version' in "Terminal", if it's no, add cmake install directory to your path.
-
After installing g++, gsound, gtk3 and CMake, do the following in "Terminal" to Build and install :
cd xtd_path_name
./install
-
Create as many applications as you want with xtd.
Build and run your first xtd application
Use internal tools installed with xtd.
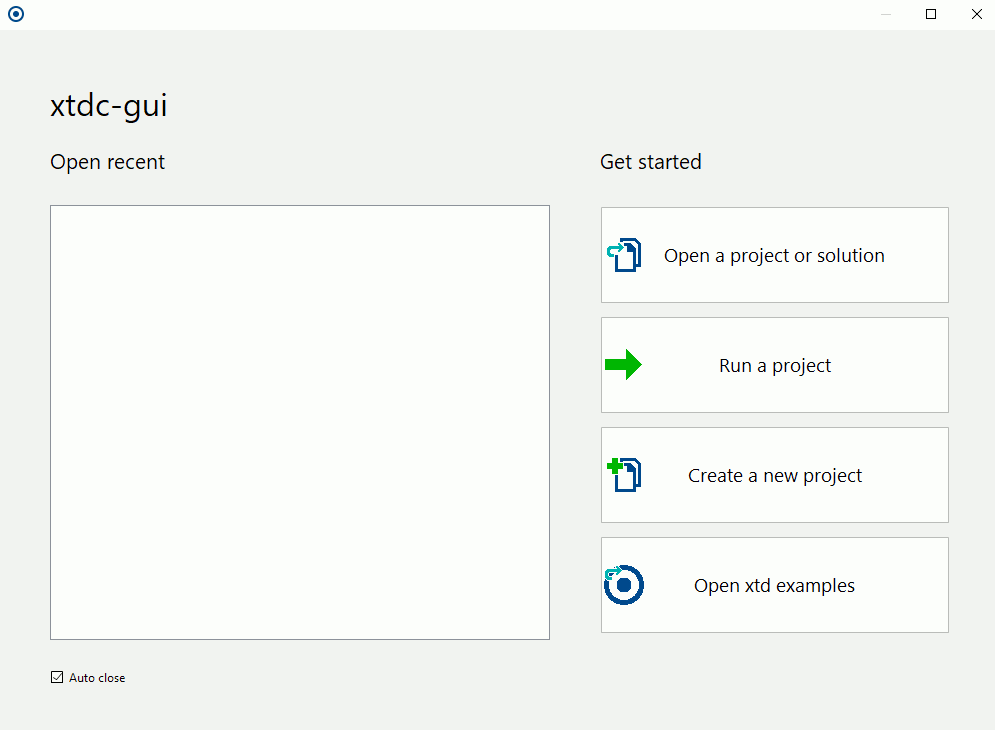
xtdc-gui (gui)
Let the gui tools drive you for create your new project.
-
First step choose "Create a new project" button.
-
Choose your project template then click to "Next" button
-
Choose the name for your new project and the path where the project will be create, and finaly click "Create button" to create it.
xtdc (console)
Create your new project with a simple command line tools.
For example, you can type :
xtdc new gui hello_world
cd hello_world
xtdc open
"xtdc" command line tool will creating hello_world gui application, generate Visual Studio sultion if you running it on Windows, Xcode project if you are on macOS or Code::Blocks project if you are on Linux. If you are on Windows, Visual Studio will running with your new project. If you are on macOS, Xcode will running with your new project. If you are on Linux, Code::Blocks will running with your project.
Remarks
See xtdc-gui for more info.
See xtdc for more info.
Uninstall
Since the version 0.2.0 you can easily uninstall xtd with one command.
Windows
-
Do the following in "Command Prompt" to uninstall xtd :
cd xtd_path_name
uninstall
macOS or linux
-
Do the following in "Terminal" to uninstall xtd :
cd xtd_path_name
./uninstall
Download logo
xtd
Gammasoft